

After weighing all my options (see part 1), I decided to go with Polyisocyanurate rigid panels for insulating the Airstream. Both Lowe’s and Home Depot carry PIC, but I like the Home Depot brand better (Rmax, made in the USA). The PIC panels are far superior to styrofoam and extruded polystyrene in just about every way (except price, but they’re actually only a few dollars more per sheet). PIC is certainly more fire-retardant (though not fire proof), and definitely equally if not more moisture resistant. They don’t call it moisture proof, but I assume that is for legal reasons only.
I actually did a test where I fully submerged pieces of PIC in sealed jars full of water and let them sit for extended periods of time. After three days submerged, the PIC came out weighing exactly the same as when it went in (indicating that it took on little to no moisture, or it would have been heavier).


After two weeks the PIC did weigh a bit more when I first removed it from the water, but after letting it sit for around an hour, it returned to its original weight. I did another check at 6 months and got the same results. Maybe not the most scientific test in the world, but good enough for me.
I went a little crazy with the actual application of the PIC panels. I decided the best method is to first cut the 1/2″ thick PIC panels into small pieces and then glue them with TremPro 635 to the exterior skins. I tried a bunch of different stuff for adhesive (TremPro 635, Vulkem 116, Silicone, 3M VHF tape, etc.), but I think the TremPro 635 is best. It works whether you’re applying it in hot/cold weather, and it’s definitely going to last.
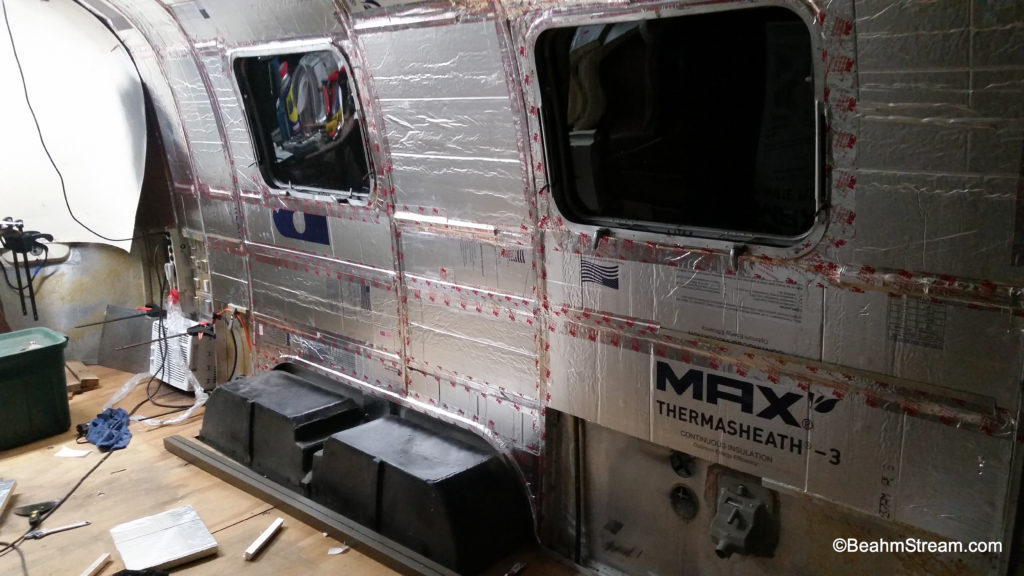
At first I was cutting the 1/2″ thick PIC into tiny 1.5″x1.5″ pieces (see photos in gallery below), but that was taking too long, so I started using 1.5″ strips (at whatever length was good for the location). I then cut sections from 1″ thick PIC panels to fit between ribs and cross members. This leaves an air gap against the skin for airflow and moisture runoff (and the possibility of running more wire if I ever need to). This method also makes it easier to repair damaged exterior panels if that dreaded moment ever arrives (vs. spray foam, which is crazy-hard to remove when repairing the exterior skins).
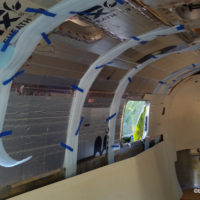
In places where there is a curve in the wall, you need to score the PIC to allow it to conform to the curve. After I scored my PIC panels, I resealed the cuts with foil tape. This is pretty easy where it’s just the simple curve of the upper side walls, but it gets tricky for the compound curves of both end caps.
 Finally, I sealed everything up against the ribs and cross members and window frames with Nashua 324A Foil HVAC tape (see photos in gallery below). Nashua 324a foil tape is my best friend. Be careful though, it will slice you if you run your finger down the edge!
 I purchased two 3″ wide rolls at Goodwill for $10 about a decade ago. When I ran out of that, I was worried because all I was finding online was a 60yd. roll for around $40, but luckily after checking the big box stores I found it at Home Depot for $17/roll (60yds., 2.5 inches wide). It’s rated to hold from -25F to 325F. That wouldn’t work if it were applied directly to the exterior skins (they actually get hotter than that in the sun), but it’s fine for using to seal the interior of the PIC panels. It sticks in the extreme cold, and it sticks REALLY well (even during application, which works all the way down to -10F). I’ve got a roll of some other non-marked foil tape (thought the cardboard roll does say Nashua), but it may as well have NO adhesive whatsoever compared to the 324a.
I also decided it was a worthwhile endeavor to put a thermal barrier between the ribs and the interior skins. The interior skins are aluminum like the exterior. The ribs are also aluminum. That means when the sun is baking the exterior of the Airstream, all that exterior heat is transferred via the ribs to the interior skins and basically turns your Airstream into a toaster oven.  I have NO IDEA why Airstream doesn’t utilize a thermal barrier on the ribs from the factory. I did some research on materials (using EPDM rubber, rolled polysterene, etc. –I even researched aerogel) and found that the best bang-for-the-buck solution is the blue polystyrene you use when laying framing on a foundation. It’s only $6 a roll at the big box stores, but I often find new rolls at salvage places for $2. It’s light, it’s thin, rivets obviously go through very easily, and it makes a HUGE difference to the interior temperature. I used an infrared temp. gun to take some readings of the interior skin over the ribs with and without the polystyrene barrier, and on an 80 degree, sunny, Colorado day, there was up to a 120F difference!
Regarding the idea of a moisture barrier… The PIC is foil faced on both sides and then sealed with foil tape on the interior. I think that is plenty for the “exterior” moisture barrier, not to mention the gap between the exterior skin and PIC panels for moisture to shed. Regarding the idea of this causing too much moisture to be trapped inside the Airstream (especially when using the propane appliances and heat)… I guess time will tell how bad it could get. One can always open vents/windows, so we’ll see how it goes. Luckily I’m not too worried about moisture collecting in/on the PIC panels, after doing my fully-submerged panel tests.
Finally, I am using two 2″ layers of PIC with air gaps between the panels and at the decking for insulating the belly. In addition to acting as a thermal gap, the air gap between the underside of the decking (floor) and the first layer of PIC also helps eliminate floor rot from moisture collection.
-

- First batch of polyisocyanurate for the Airstream insulation.

-

- a million tiny pieces

-

- lots of tiny pieces

-

- scoring and taping for the curve

-

- switching to strips

-

- air gap detail

-

- long strips

-

- scored and taped and in place

-

- the end caps are tricky

-

- end cap

-

- crazy shapes for compound curves

-

- wedging it in

-

- puzzle pieces

-

- around the ceiling vents

-

- around the windows

-

- getting close!
-
- thermal barriers at ribs

-

- skins over thermal barrier

Hi there,
I have just read this article and I think it’s fantastically helpful! I am about to go through the same process of insulating my Airstream and I think this looks like the best way to do it (and obviously very well researched). I was just wondering what it costed you to use this method of insulation? My caravan is 25ft and I know that it’s all relative, but just having a ballpark figure of what you spent would be really useful.
Thanks in advance
I am not sure on total cost. My trailer is the same size as yours, but I have been doing everything over an extended period of time (as the money comes in), so I don’t have a solid “all at once” figure on purchased materials. Being able to install over time and doing one section at a time was a major reason to go with the PIC panels though. I get a little cash, I run to Home Depot and buy a couple sheets of polyisocyanurate to install. When I get more cash, I do it again! [wink]
What would you think of applying the surface foil, or a vapor barrier product like Stego Wrap, or the bubble wrap against the exterior skin, spraying closed cell foam against that and using the (v clever) idea of sill seal on the “studs”? I am not sure I understand the runoff theory if there is condensation on the outside skin, inside – doesn’t that vapor sit on the floor eventually? We experimented in a house with closed cell foam and the bond is quite adequate to the plastic materials if applied by a pro.
I so appreciate you thinking of this stuff for all of us! Its been more helpful than you could know.
Mike
Regarding spraying foam over a vapor barrier or “bubble wrap” placed against the skin… you lose two major benefits of the spray foam in this scenario: sealing the skin seams (and other tiny holes, cracks, slits, etc.) and any added structural integrity offered by the rigidity of the foam when adhered to the skins and ribs. Regarding the vapor run off… that condensation *should* run down the interior of the exterior skins, collect in the C channel that sits on the sub floor, then exit the trailer through the weep holes in the C channel.
I have never seen the weep holes in the bottom channel. Can you send a pic?
They are just small holes drilled through the c channel and decking to allow moisture to drain out through the belly pan. I have seen some builds that do not have them, but most trailers I’ve seen from the 70’s do. Basically just a way for condensation and leaks that run into and down the walls to drain out instead of collecting on top of the deck and rotting the wood.
Hi,
I just found your website. Wonderful knowledge.
I am beginning to insulate my 69 Overlander now and read your article. Loved it. I was going to use Rockwool Comfortbatt until I read your article.
How do you like your decision? Are you happy? Does the polyisocyanurate squeeze when you walk about in the trailer?
Any other pointers I need to know before I just jump in?
Thank you for your time!
Enjoy!
Sincerely,
Alva LaChance
I am definitely happy with the PIC panels. I too was a little worried about “rubbing noise” (styrosqueak) when moving around, but I have not experienced any of that kind of noise, and we’ve made some long trips and parked in some pretty wonky places (uneven, not very stable ground). Just make sure all your panels are stable (smashed in there tight and then taped well with the foil tape) so they aren’t flopping around or able to move against anything that would allow them to squeak. Again, I chose polyiso because it afforded me the opportunity to go in sections and not do it all at once. I am hoping to try spray foam on the next one (remember, it needs to be a cold application, as hot might warp the skin!), but that requires having everything all planned out and set up beforehand, especially in regard to electrical and plumbing venting in the walls. Not to mention paying for it all at once!
I was fairly precious about using every last bit of polyiso thinking it would help with cost. For sake of getting things done, I could have been a little more cavalier with my cuts and installing. Also, I think *strips* are easier (and probably better) than a bunch of tiny little squares for the stand-offs. You need to have those air gaps between solid panels, but I think cutting and gluing strips is quicker and easier (you can still use scrap, just cut into strips instead of squares).
Finally, the thermal barrier at the ribs (interior side) is key! That blue sill plate foam works great, and makes a HUGE difference in the temperature of the interior skin on a hot, sunny day. Just make sure it stays put during the install and doesn’t slip off the rib when you rivet the interior skin.
Getting ready to do the belly very soon, and so happy I’m not filling it with rockwool or batt (which is basically just a sponge to hold moisture against the frame and subfloor!).
One more thing I forgot to mention… while PIC does provide better opportunity to fish wire through the gaps *after* installation if you need to, try and get all your wiring run first so you don’t *have* to do it later. If possible, run plastic conduit with some extra space in it that will allow you to run additional wire if you need to in the future. Bonus points for including a string inside the conduit to facilitate pulling a new wire in the future!
And don’t forget… your plumbing system needs vents from the pipes and tanks all the way to the roof! Run pipes for the plumbing vents before you install the insulation! I didn’t do this on my first build, and had to figure out “clever” ways to vent properly without being able to take the vents up through the wall cavity.
DB,
Do you have an email I could reach you and not fill up your website? You should have mine, and feel free to email me there.
I’m using 2″ strips, spaced 2″ apart. I’m pretty much done with everything but endcaps. I’m looking forward to putting interior skins back in! Maybe aluminum tent camp in aa weekend or two! Woohoo!
It’s been a long road, doing this restoration by myself. I’m looking forward to moving in soon!
Just had a thought. Did you insulate the wheel wells?
Absolutely!
Hi, I was wondering if you remember roughly how many sheets of rmax it took
I’m interested in an update from your end on how this insulation option has held up for you now that several years have passed.
I saw one of your replies from above indicating that blue sill plate foam noticeably improved heat transfer through the ribs on hot days. On that front (and from a perspective of the overall effectiveness of all your chosen insulation mediums and techniques) I’d like to know if you have had a chance to use it colder weather (and if so, how well it performed).
Airstreams are sometimes referred to as ‘3 season’ RVs. I am in Michigan and have a 1987 Excella that I picked up used this year and have been contemplating how to make it a comfortable ‘4 season’ camper. I’ve considered skirting it, creating custom ‘storm window’ overlays w/ framed cellophane, to be installed right over top existing window screen and ceiling vent/fan frames.
If your camper has done well (or even substantially better) in colder weather, I’d consider your insulation technique as well.
@Matt Marshall… I am currently in my toasty 25 ft. Land Yacht, and it has been in the low teens at night. I finally got the floor insulated (I actually removed the fresh water tank out of the belly so that I could go *all insulation* except for the gray tank, and it has been great. It’s bizarre to me that Airstream doesn’t offer anything called “four season,” as it’s definitely doable (though not with their current insulation and layout offerings). In addition to the benefits of the polyiso panels, sealing everything up super-tight with the foil tape and good weather stripping on the doors and hatches is key.
I have the 25′ Land Yacht trailer and a 24 foot Argosy (Airstream) motorhome as my personal use options right now. The Argosy motorhome is stock, so it allows me to compare what Airstream provided and how the upgrades perform in the custom Land Yacht. The Argosy does “ok” in the cold with the factory furnace (propane) running all the time. The Land Yacht with the “super insulation” does great with just a small electric space heater. When it gets “super cold” I use a propane Big Buddy heater, and it gets “too hot” quickly. I am looking forward to trying out hydro-radiant heating in my next personal build for a more consistent temperature (and warm floors!).
When I use a laser thermometer on the walls of the Argosy vs. the Airstream, there is a significant difference in temperature. Taking a reading on the ribs also tells me that the foam “thermal break” is making a noticeable difference.
I have also considered creating the storm windows you are talking about, but since the Land Yacht has double panes, I haven’t gone that far yet. Colorado also gets 300 days of sunshine, so even though we get a good deal of snow, the sun warms things up pretty good during the day …very different than the gray, cold, icy Indiana winters I grew up with.
If you make the “storm windows,” I highly advise using acrylic instead of cellophane (much more durable and robust). I would put rubber weather stripping around the edges. I like this EPDM stuff for most applications: https://www.lowes.com/pd/Frost-King-10-ft-x-1-2-in-White-Rubber-Foam-Window-Weatherstrip/1009791
Heavy curtains or cell-style blinds make a huge difference (be sure to keep them snug around the edges of the windows), and stuffing a square “couch pillow” into the roof vents makes a huge difference. I just went and bought four clean, sturdy pillows from Goodwill for a couple bucks a piece.
Finally, when I planned my trailer layout, I made sure all my water lines and the pump were in the same general location (everything is within the galley cabinets) so I can run a tiny electric space heater in that compartment to assure nothing freezes, even if it gets crazy outside or I don’t want to heat the whole trailer. When I removed the large freshwater tank from the belly, I replaced it with a 30 gallon freshwater tank under the dinette seat, and put a 120v heating matte under the tank. I then opened up that compartment to where the rest of the water lines run so I can keep all that closed and heated with the small space heater.
So the polyiso and foil tape is a great way to insulate the shell and floor, and if you pay attention to where you run the water lines and be sure to create a compartment to keep the H20 components heated, four seasons is definitely do-able!
Thanks for the quick response DB!
It sounds like your insulation has panned out nicely. Prior to coming across your blog here, I was seriously thinking about going the basic rockwool approach promoted by people like Miller Garage on YouTube. However, they are down in Texas, and I had pretty well assumed he was not considering Michigan winters when he chose that option. :)
Your approach makes more sense to me for colder climates. Also, I have not come across others who promoted putting a radiant barrier b/w the ribs and the inner skins. I absolutely plan to lift that idea from your blog here as well. :)
Thanks for the tips on a better way to do the storm windows. I need them to be effective. But also, I want something that I can easily screw/strap/whatever on in the winter, and then remove the rest of the year.
Also, I really like the idea of putting a little electric heater by my pump, water intake lines and the bulk of my plumbing when I get to a point where winter use is realistic. I might have to do two of those as my kitchen, clean water tank access, and pump are on the curb side, while my bathroom and hot water heater are on the street side of my Airstream. For now, I just have all the plumbing winterized.
Thanks again!
BTW, I wish I had the double paned windows. I don’t think they did them in my ’87 Excella… at least not standard equipment.
Yeah… it actually seems pretty arbitrary across the decades. Some do have double pane, some don’t, and there doesn’t seem to be much rhyme or reason.
By the way… I have explored a lot of methods by which to fasten a sort of “storm window” (also to make the screens removable). I think the two best ideas are rare earth magnets and threaded rivets (also called a rivet nut or a threaded insert). Both have their merits, but I the threaded rivets are probably the most robust solution.
Finally, with the radiant barrier at the ribs… after a certain amount of time, the skins will reach equilibrium no matter what, but that barrier at the ribs makes a huge difference in regard to *how fast* those interior skins get hot or cold.
p.s. I just read a post on Airforums where someone had installed radiant electric under their new flooring, and they were claiming it was working to heat the whole interior. I installed electric radiant under the tile in my home’s master bath, and I have a hard time believing it would work that well in an Airstream, but it might be worth looking into. I think it would require a lot of electricity, but if that’s not an issue, it might be a good heat source (and it’s certainly nice having warm toes).
Makes sense on radiant barrier eventually equalizing.
I could see radiant heating working if enough coils/lines were laid. But I’d use it as an alternative to propane heating only when I had access to shore power, such as in RV campgrounds.
I don’t know if this is how it came from the factory, but all my screens were secured by screws when we bought our Airstream. I was thinking that I could back some or all those screws out and then secure my ‘storm window’, using longer screws, through those screw holes.
Matt, if your screens are attached by screws, they probably aren’t factory. While it’s *annoying* that the screens are riveted (you can’t clean or manipulate the windows from the inside), because the screen and trim are fastened to thin substrates, rivets definitely hold better than screws (which will back out with vibration over time, not to mention wearing the hole larger if you’re screwing them in and out). The rivet nuts allow the best of both worlds. The threaded part is actually a rivet fastened to the skins/ribs, and the screw goes through the screen trim and into the threaded nut. I had actually considered finding another full set of window trim so I could use the screens in the summer and the “storm windows” in the winter.
Thanks… The screens look like factory screens, but they must have been pulled off at some point (maybe to replace the original screening in them??).
I never heard of rivet nuts. I’ll use them. That sounds like the way to go. I like the idea of being able to reliably swap the normal screen for the ‘storm’ windows w/o al the wear and tear on those holes.
Gotta say, this is a great blog. A wealth of info. Thank you!
This is very helpful, thank you! We are at this stage right now and have been doing an excessive amount of research until I saw you linked these posts in airforums.
Thanks so much for a wealth of information! I am in the process of renovating a 1966 Airstream Overlander. I have spent hours on Airstream forums and this is by far the best article yet!!! Thanks again for a great explanation and pictures!
Hi there,
We really appreciate all your thorough research and explanation! We bought a 1969 Land Yacht Overlander International from my Uncle who hasn’t used it since 1980 or so. When reading your description, I was picturing the thermal barrier wrapped around the three sides of the rib, but your pictures show that only the part that touches the interior skin was covered. Did you consider “wrapping” each rib and decide against it for some reason?
Jess and Mike
The two sides of that rib won’t come in contact with anything that would transfer heat/cold. Heat/Cold will transfer from the outside metal skin, through the metal rib, and through/to the metal interior skin (where all three of those materials are in direct contact). Lining the rib with a thermal barrier (like foam) on the surface reduces the amount of heat/cold transferring from outside to inside. The sides of the rib should only come in contact with insulation or air, so there shouldn’t be any reason to line the sides with anything. If the worry is cold/heat radiating off the sides of the rib, there should be minimal concern with that issue (especially when the walls are filled with insulation). Surface area is a huge contributor to temperature shifts. If just the ribs (minimal surface area) were heating up, it wouldn’t be much of an issue, but since that heat (or cold) is then transferring to a giant surface area which then radiates that unwanted heat/cold, it can really alter the interior temperature of the cabin.