Bookmarked Airstream Articles and Information

Just some links I’ve found useful…


Boondocking

http://wbccicaravan.wbcci.net/boondocking-with-your-airstream/


Plumbing

http://vintageairstream.com/plumbing/

https://www.trekwithus.com/the-complete-guide-to-rv-water-filtration/


Propane Lines and Quick Connects

http://www.introductiontoeverything.com/2017/03/connecting-my-lp-generator-to-my-rvs-lp-port/


Tripping

http://www.airforums.com/forums/f42/campsite-pics-174884.html

Dinette Table Base

I am always baffled when I see Airstream interiors with a couch or two chairs under the panoramic window.  What a waste of space!  The dinette with seating that wraps around a table is obviously the way to go, so one can maximize on seating, have a decent table at which to eat, and also to collapse into an extra bed. Not to mention all the extra storage in the dinette bench seats!

However, I can’t believe how hard it is to find a decent telescoping base for a dinette table!

Most of the choices come from yacht outfitters, and are thus astronomically priced.  The few “RV Specific” bases I have found seem to be poorly reviewed as a result of being poorly constructed (weak materials that lead to wobbling and bending).  The two companies that come up most often in a search for RV dinette/table bases are Springfield and Garelick.  The products from each company look to be fairly similar, but for what it’s worth, the reviews for the Springfield products are much better than those for the Garelick.  This means that either the Springfield bases are a superior product, or Springfield has a better social media and internet team.

Through Deck vs. Surface Mount

Since I’m rebuilding from scratch, this wouldn’t be as much of an issue for me, but it definitely does lock you in to the position you originally install (since it telescopes through a permanent hole in the floor, and sticks out into the belly pan area).  I think most people will want a surface mount base, and since there isn’t much difference in availability between surface mount and through-deck, I’m just going to stick with surface mount (which is ultimately an easier install anyway).

The surface mount, telescoping pedestal base that seems most solid, best reviewed, and within price range (though still more expensive than I would expect at around $400) is the Springfield 12″ – 28″ Anodized Air-Powered 3-Stage Table Pedestal.  There are three slight variations that included differences in lift range and finish materials, but this one has the lowest price (by about 40 bucks) and the highest reviews.  It’s also conspicuously similar to the base pictured in the Airstream brochure photo above, so there’s that.

Another interesting and slightly less expensive (around $250) option from Springfield is the lever lift Springfield Marine 1660203 Polished Aluminum 12-25 Inch Adjustable Hinged Boat Table Pedestal, though it’s quite a bit bulkier, and I see lots of opportunity for pinched (or even lost!) fingers.

Penguine Eng LTD looks great and has a lot of selection, but it’s in Great Britain, so there’s VAT and shipping on top of already “luxury” pricing.

Motorized Pedestals

Motorized is great for the “wow” factor, but my philosophy is, “The more you motorize things, the more opportunity there is for mechanical failure.”  If you can make something function well without sacrificing ease of use, that is the way to go.  Can gas/air systems fail?  Of course.  Will they fail as often as something that uses electricity, plastic gears, wires and solder, etc.?  Nope.  If gas/air makes it easy to lift/lower a table (vs. a completely manual system which is difficult to slide up and down and lock in place) while minimizing the chance of mechanical failure, then for me, a gas/air lift telescoping base is the superior choice.


Have you found something else that you like or think works better?  Leave a comment and let everyone know!

Insulating an Airstream (part 2: practical application)

After weighing all my options (see part 1), I decided to go with Polyisocyanurate rigid panels for insulating the Airstream.  Both Lowe’s and Home Depot carry PIC, but I like the Home Depot brand better (Rmax, made in the USA).  The PIC panels are far superior to styrofoam and extruded polystyrene in just about every way (except price, but they’re actually only a few dollars more per sheet).  PIC is certainly more fire-retardant (though not fire proof), and definitely equally if not more moisture resistant.  They don’t call it moisture proof, but I assume that is for legal reasons only.

I actually did a test where I fully submerged pieces of PIC in sealed jars full of water and let them sit for extended periods of time.  After three days submerged, the PIC came out weighing exactly the same as when it went in (indicating that it took on little to no moisture, or it would have been heavier).

After two weeks the PIC did weigh a bit more when I first removed it from the water, but after letting it sit for around an hour, it returned to its original weight.  I did another check at 6 months and got the same results.  Maybe not the most scientific test in the world, but good enough for me.

I went a little crazy with the actual application of the PIC panels.  I decided the best method is to first cut the 1/2″ thick PIC panels into small pieces and then glue them with TremPro 635 to the exterior skins.  I tried a bunch of different stuff for adhesive (TremPro 635, Vulkem 116, Silicone, 3M VHF tape, etc.), but I think the TremPro 635 is best.  It works whether you’re applying it in hot/cold weather, and it’s definitely going to last.

At first I was cutting the 1/2″ thick PIC into tiny 1.5″x1.5″ pieces (see photos in gallery below), but that was taking too long, so I started using 1.5″ strips (at whatever length was good for the location).  I then cut sections from 1″ thick PIC panels to fit between ribs and cross members.  This leaves an air gap against the skin for airflow and moisture runoff (and the possibility of running more wire if I ever need to).  This method also makes it easier to repair damaged exterior panels if that dreaded moment ever arrives (vs. spray foam, which is crazy-hard to remove when repairing the exterior skins).

In places where there is a curve in the wall, you need to score the PIC to allow it to conform to the curve.  After I scored my PIC panels, I resealed the cuts with foil tape.  This is pretty easy where it’s just the simple curve of the upper side walls, but it gets tricky for the compound curves of both end caps.

Finally, I sealed everything up against the ribs and cross members and window frames with Nashua 324A Foil HVAC tape (see photos in gallery below).  Nashua 324a foil tape is my best friend.  Be careful though, it will slice you if you run your finger down the edge!


I purchased two 3″ wide rolls at Goodwill for $10 about a decade ago.  When I ran out of that, I was worried because all I was finding online was a 60yd. roll for around $40, but luckily after checking the big box stores I found it at Home Depot for $17/roll (60yds., 2.5 inches wide).  It’s rated to hold from -25F to 325F.  That wouldn’t work if it were applied directly to the exterior skins (they actually get hotter than that in the sun), but it’s fine for using to seal the interior of the PIC panels.  It sticks in the extreme cold, and it sticks REALLY well (even during application, which works all the way down to -10F).  I’ve got a roll of some other non-marked foil tape (thought the cardboard roll does say Nashua), but it may as well have NO adhesive whatsoever compared to the 324a.

I also decided it was a worthwhile endeavor to put a thermal barrier between the ribs and the interior skins.  The interior skins are aluminum like the exterior.  The ribs are also aluminum.  That means when the sun is baking the exterior of the Airstream, all that exterior heat is transferred via the ribs to the interior skins and basically turns your Airstream into a toaster oven.  I have NO IDEA why Airstream doesn’t utilize a thermal barrier on the ribs from the factory.  I did some research on materials (using EPDM rubber, rolled polysterene, etc. –I even researched aerogel) and found that the best bang-for-the-buck solution is the blue polystyrene you use when laying framing on a foundation.  It’s only $6 a roll at the big box stores, but I often find new rolls at salvage places for $2.  It’s light, it’s thin, rivets obviously go through very easily, and it makes a HUGE difference to the interior temperature.  I used an infrared temp. gun to take some readings of the interior skin over the ribs with and without the polystyrene barrier, and on an 80 degree, sunny, Colorado day, there was up to a 120F difference!

Regarding the idea of a moisture barrier… The PIC is foil faced on both sides and then sealed with foil tape on the interior.  I think that is plenty for the “exterior” moisture barrier, not to mention the gap between the exterior skin and PIC panels for moisture to shed.  Regarding the idea of this causing too much moisture to be trapped inside the Airstream (especially when using the propane appliances and heat)… I guess time will tell how bad it could get.  One can always open vents/windows, so we’ll see how it goes.  Luckily I’m not too worried about moisture collecting in/on the PIC panels, after doing my fully-submerged panel tests.

Finally, I am using two 2″ layers of PIC with air gaps between the panels and at the decking for insulating the belly. In addition to acting as a thermal gap, the air gap between the underside of the decking (floor) and the first layer of PIC also helps eliminate floor rot from moisture collection.

TremPro 635

All Kinds of Goo (Poly Caulk and Other Seam and Leak Sealers)

There are SO MANY different kinds of stuff to use for sealing seems and leaks in an Airstream.  The Original stuff used in manufacturing was called Vulkem 116, and it’s still available (either as Vulkem 116 or TremPro 626), but the original Vulkem company was bought out by TremPro.  Vulkem 116 is gritty and will stick to EVERYTHING.  It also takes FOREVER to cure (so cleanup rags will remain gooey for days).

There are a LOT of varying opinions about what’s best to use for what, so I am posting what I’ve learned from researching and using the various products.

The original factory “caulk” is Vulkem 116 (gray), and is now marketed as either Vulkem 116 (the original name) or TremPro 626.  It’s a texturized (gritty, like it contains sand) poly that takes FOREVER to cure (which can be a good thing when you’re talking Airstream).  The “official” cure rate is 48-72 hours, but it can take a lot longer than that, depending on the actual environmental conditions.  Vulkem 116 also cures fairly hard when completely cured, and is thus best for exterior panel seals, a/c installation, setting window frames, etc.

Vulkem 631 is Vulkem 116 but in different colors.

TrempPro 636 (gray) has a slow cure rate (4 hours), has more solvent (better for exterior applications), and is non-textured (smooth).

TremPro 635 (gray) has a faster cure time (90 minutes), and is a low VOC/solvent free silane terminate poly.  So far, this stuff is my favorite, especially for things on the inside.  If you’re doing Airstream restoration, I recommend having at least two tubes of this stuff around, as it’s not available from a lot of places and often takes a while to ship and arrive.

Sikaflex 221  (black) has a fast cure time (60 min.), but seems to require a cleaner surface for adhesions, whereas the Vulkem and TremPro will stick to just about anything.  Some people think it looks better (smoother, more like typical caulk) and is a little easier to work with (doesn’t stick to everything).  It’s typically used for things like interior vent, window, latch, etc., applications.

The products above are for more “construction” type applications.  There are several products like that can be used to seal tiny cracks and leaks around rivets, etc.  These sealers actually wick into the cracks and crevices, whereas the products above are more for adhesion and filling larger gaps and holes.

Acryl-R seems to be a lot of people’s favorite for a wicking sealant, but it takes a special applicator.  The “go to” product for sealing on the road seems to be Captain Tolley’s Creeping Crack Cure.

Parbond from Parr is a sort of “in between” product that comes in a “roll-up” tube (like toothpaste) instead of a caulking tube. It is silver, so shows less than something like Sikaflex on exterior applications.  This is a good product to have with you on the road when you don’t want to store a caulking gun and larger amounts of sealant.

Butyl Putty Tape is what you need to use when setting windows, a/c, vents, and other things that have a collar and set in to a hole in your Airstream exterior.  This soft, flexible product is like a roll of flat Silly-Puddy that will seal two surfaces together and keep them that way.

Walbernizer specifically formulated for Airstream coated aluminum surface.


Rivets!

If you’re going to work on an Airstream, you have to know about rivets.  Here is some basic information to get you started.

You “pull” a blind rivet.  You “buck” a solid rivet.

First of all, there really shouldn’t be any screws on an Airstream.  Screws will back out of their holes with the constant road vibration that an Airstream experiences, so eventually a screw will no longer be holding whatever it was screwed into.  Rivets are more “permanent” in that they stay put.  But don’t worry, they are easy to drill out if you need to change something you’ve riveted.

Blind Rivets

There are two types of rivets on an Airstream: bucked rivets and blind rivets.  Airstreams use only two sizes:  1/8″ and 5/32.”  The 1/8″ rivets are generally used for trim on the exterior, and to hold the skins to the ribs on the interior.  The 5/32″ rivets actually hold the Airstream together (panels and ribs).

Blind rivets get their name because you can install them in situations where you can’t see both sides of the surface being riveted (there is a blind side).  So if you are fastening something to another surface without being able to see the back (like skins or trim), you would use a blind rivet.

There are two types of blind rivets, often referred to as “Olympic” and “pop” rivets.

blind rivet (olympic rivet)

blind rivet (pop rivet)

The pop rivet is a pin with a bulb head (the mandrel) inserted through a cylindrical shaft.  The rivet is “pulled” with either a manual or pneumatic puller.  The center pin pulls into the shaft which in turn expands and keeps the rivet in place.  The pulling tool cuts the pin at the head once it pulls into the shaft leaving a dimple in the head where the pin has been cut off.

manual rivet puller

manual rivet puller

pneumatic rivet puller

pneumatic rivet puller

You can get a manual rivet puller from Harbor Freight for under $10.  This is pretty nice to have on the road, as you can pull rivets without needing an air compressor.  The pneumatic rivet puller is a bit nicer, especially if you are doing a LOT of rivets, but obviously it requires a compressor, so it isn’t as portable for road repairs.

The Olympic rivet operates on similar principal to the pop rivet, but the containing shaft splits into three arms that hold the rivet from behind the sheet being riveted (like a drywall anchor).  You can machine/shave a blind rivet to make it look like a bucked rivet with a smooth head (see photos below).

Here is a good thread on Airforums containing the photos below regarding how Olympic rivets work (the photos are from user flyfshr).
http://www.airforums.com/forums/f381/olympic-rivet-removal-and-installation-23.html

photo credit: flyfshr on airforums

expanded Olympic rivet

photo credit: flyfshr on airforums

rivet shaving tool

photo credit: flyfshr on airforums

unshaved Olympic rivet

photo credit: flyfshr on airforums

shaved/machined Olympic rivet

For the record, Olympic is actually a brand name, not a type of rivet (like Kleenex is synonymous with tissue).  There are many types of rivets made under the Olympic name. Only one type is originally used on Airstreams. They’re called Olympic Bulb-Tite Shaveable Head rivets, either 1/8″ in size or 5/32″.

Bucked Rivets

buck rivets

buck rivets

Bucked rivets look like tiny metal mushrooms.  There are no moving parts.  A bucked rivet is hammered with a pneumatic riveting gun, and the soft aluminum mushrooms out to hold the rivet in place.  Buck riveting usually takes two people, because someone needs to hammer one side while someone else “backs” the rivet by holding a small anvil (the buck bar) against it.

Advice on rivet length from this thread:

Always try to use the correct length rivet. It should be long enough to penetrate the parts to be riveted and still protrude to a length approximately 1-1/2 times the rivet diameter. In other words, a 1/8″ diameter rivet should stick out about 3/16″ (certainly not less than 1/8″) before it is bucked.

buck riveting gun

buck riveting gun

bucking bar

bucking bar


The rivets on my Airstream aren’t all perfect (some are far from it, in fact).  There seem to be a lot of factory rivets that were skipped or at least skimped on.  Below you can see some examples of what I’m talking about.

Before (through the holes, but not really mushroomed and holding anything together):20151206_140752

20151206_140801

After (mushroomed out and actually holding the two pieces of aluminum together):20151206_140811

Clecos

clecos

clecos

I love clecos.  Mostly just because they look cool.  They are like clamps for riveting.  Basically they are temporary rivets.  You place clecos in rivet holes using a special cleco tool (cleco pliers) that makes the spring-loaded cleco grab and release by pushing on the end of it.

cleco pliers

cleco pliers

clecoed in place

vista vue window clecoed in place

Removing Rivets

Rivets are removed by drilling them out.

Sometimes you will see/hear people using a number instead of a size (inches or millimeters) for a drill bit.

5/32″ is .15625 and a #21 is .159; thus the #21 drill bit gives a 5/32″ rivet a little clearance to slide into the hole.

#40 = 3/32”

#30 = 1/8” (which is the shank size of the rivets used most extensively in assembling the interior of an Airstream)

#10 = 3/16”

For removing Olympic rivets, Andy from Inland RV says:

An Olympic rivet is 5/32 which is .15625 inches


#20 is .161
#21 is .159
#22 is .157


The best drill bit size to use is a #21, since a hole will not be perfectly round, unless using a drill press.

Andy also says:

Olympic rivets for Airstream usage have always been 5/32 shank, but with the same size “brazier head” as the 1/8 buck rivets.

That is so the looks do not basically change and the strength of the shank was maximized, so as to be similair to the buck rivets shan strength.

For what it’s worth, I have just been using 1/8″ and 5/32″ drill bits to remove rivets and to install rivets.  I simply use the bit to route out the head, and when that pops off (sometimes you might want to use a sharp chisel to carefully shave the head if it’s being stubborn), I make sure to be centered and drill out the old rivet body.

Other links used for this post:

Removing a solid rivet: http://wiki.matronics.com/wiki/index.php/Removing_Solid_Rivets

http://www.airforums.com/forums/f381/right-size-drill-bit-for-olympic-rivets-85451.html

http://www.airforums.com/forums/f381/factory-rivet-vs-repair-rivet-6368.html#post49015
post #14 = pics of all the rivets

http://www.airforums.com/forums/f381/buck-rivets-or-olympic-rivets-32693.html

http://www.airforums.com/forums/f381/buck-rivets-look-wrong-using-wrong-air-hammer-bit-120715.html

Insulating an Airstream (part 1: research and theory)

Sprayed Foam vs. Rigid Panel vs. Batt vs. Bubble/Foam Foil

I had quite a few questions to answer before deciding how I would insulate our Airstream.  I was lucky enough to get our trailer with the interior already removed, which means I didn’t have to deal with the toxic mess of removing the original fiberglass batt, which is almost ALWAYS infested with rodents, their homes and tunnels, and their droppings in these older Airstreams.  Not only that, but the batt is usually wet and filled with mold, and often still glued to the skins and difficult to remove completely.

I knew I wouldn’t be reinstalling fiberglass (it’s AWFUL to work with, and doesn’t hold up as well as a lot of the newer alternatives), but I wasn’t certain as to which option would be best for us.  My initial thoughts revolved around using Spray Foam, but I did a lot of research and eventually decided to go a different route.

Here were my areas of concern when thinking about insulation for the Airstream:

  • maximizing R value
  • containing heat while allowing vapor/moisture to escape (we plan on using our Airstream all four seasons)
  • ease of installation
  • cost
  • availability
  • durability and endurance (how long the insulation will last)

Spray Foam

As mentioned, Spray Foam was my initial choice for insulating the Airstream.  The thought of using a very light product that not only gets into EVERY nook and cranny, but also seals things up and ads structural integrity to the trailer just seemed like a no brainer.  However, there were some issues I uncovered that eventually caused me to go in another direction.

Spray Foam Cons (for my Airstream):

  • Harder to find material or someone to do it
  • Commercial sprayers create heat than can warp skins and ribs
  • You have to do it all at once (nozzles are one time use, rented equipment or someone else doing it, etc.)
  • Even though it’s not necessarily toxic (depending on the specific product), it makes a mess
  • Once installed, repairs are very difficult because the foam is bonded to the skin and must be removed with chemicals –this is the main reason Timeless Travel Trailers doesn’t use spray foam in their trailers

A lot of people on the Airstream forums expressed concerns with Spray Foam breaking down into “fine powder” because of road vibration, but I think there are enough examples of places it has been used successfully (factory installed in various Argosy and other brand trailers, most modern refrigerated trucks, people who’ve done it themselves, etc.), to eradicate those concerns.  Perhaps the cheap “canned foam” options from big box stores would break down, but I think commercial products will hold up to the rigors of the road.

Bear in mind, if you go the Spray Foam route, you need to make sure the product is closed-cell foam (not open cell, like the canned stuff at the big box stores, which will take on and retain moisture).

Also, spray foam seams like a bad idea for the chassis (insulating the underside), as it will retain water between the floor and the foam and thus contribute to floor rot, not to mention it prevents access to all the stuff down there that might need regular access (wiring, plumbing, holding tanks, etc.).

Fiberglass Batt or Rockwool

If the state of the original fiberglass or rockwool that you see when removing your panels isn’t enough to assure you that there are now better choices, here are some other reasons fiberglass batt sucks:

  • collects and retains moisture that turns into mold
  • moisture greatly reduces R value
  • is easily penetrated (inviting even) and harbors vermin
  • awful to work with (incredibly itchy in your skin)
  • settles in the walls to reduce R values over time much more so than rigid panels or spray foam

Foil-faced Foam and/or Bubble Wrap

A lot of people go with Reflectix or Prodex. And though the two products look similar, they are actually quite different.  Reflectix is foil-faced bubble wrap (yes, that bubble wrap).  It’s fairly worthless.  Prodex is actually foil faced closed-cell polyethylene foam, which has a greater R value than bubble wrap (meaning a “real” R value).

Reflectix is more readily available; you can pick it up at your local big box store, but it doesn’t do much for you.  Your Airstream is already made of a reflective material (shiny aluminum!), and the bubble wrap doesn’t really insulate anything (very minimal air contained within the thin layer of “bubble”).

Prodex must be ordered, it’s relatively expensive, and I’ve read in quite a few places about Prodex delaminating (the layers coming apart). 700 square ft. (two, 24 inch wide x 175 ft. rolls) is around $250.  Most variations on size still come in around $250 for 700 sq. ft., so the product is around $2.80/sq. ft. (right around the same price as Rigid PIC Panels).

Many people will point out Prodex’s claim of an R-16 rating, but that rating comes with some pretty unattainable parameters (at least in an Airstream).  From their product spec sheet:

Parameters of test: 24-inch on center 2″ x 6″ wood assembly. Roof application. Test method ASTM 1116. Airspace of 2.64 inch on each side of product. Heat-flow direction down. Interior side of product exposed.

To get an R-16 rating from a 3/16″ sheet of Prodex, you need more than two-and-a-half inches of air space on either side of the material, PLUS air flow (venting).  I can’t seem to find an R value for the product without the air space on either side.

Prodex is extremely easy to install and they claim it is self-sealing, so that’s great, but cost and availability (and the fact that the Airstream doesn’t have 5 inch walls) knocked it out of the running for me.

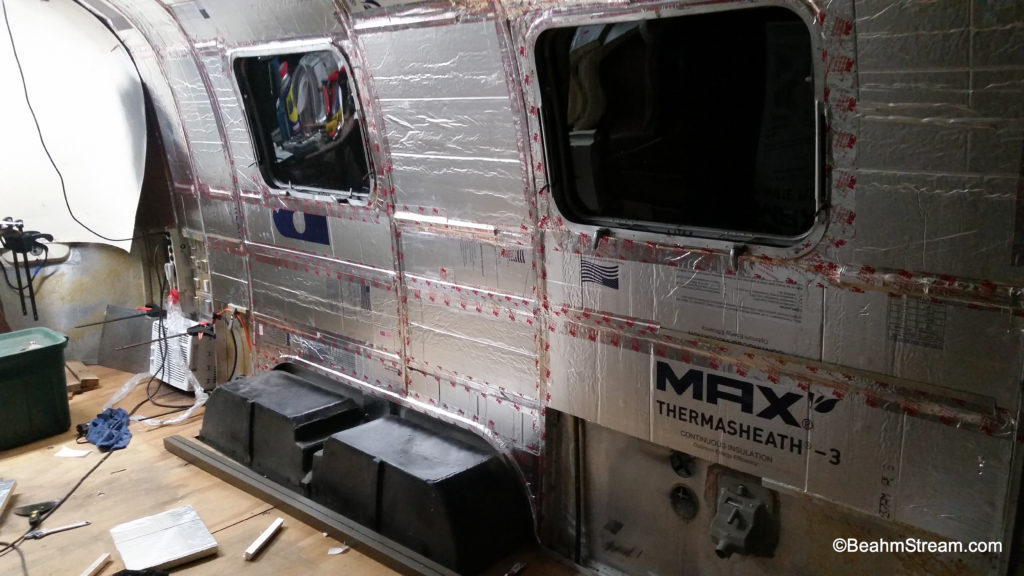
Polyisocyanurate Rigid Panels

There are several types of “rigid panel” foam products.

Polyisocyanurate (PIC) panels are rigid foam panels that are quite water resistant and sport an R value of 6.5 per one inch of thickness.

Thermasheath Rmax is sold in 4’x8′ sheets and is readily available at Home Depot (Lowe’s does not carry any PIC panels, only extruded poly and Styrofoam).  At the time of this posting, here in Colorado a 1/2″ thick panel (R 3.2) is $11.97, a 1″ thick panel (R 6.5) is $16.35, and a 2″ thick (R 13.1) panel is $28.85.  Obviously the 2″ thick product is too thick for the Airstream wall cavity, so you’ll either need to go with the 1″ thick product or multiple layers of the 1/2″.

The 1″ thick panels will need to be scored to follow the contour of the Airstream walls, and the scores then need to be resealed with foil tape to maintain the moisture/radiant barrier of the foil facing.  The 1/2″ panels will actually bend enough to follow the contour of an Airstream (though not the compound curves of the end caps) without scoring the backside of the panel.  If cost is not an issue (the half inch panels are more expensive in regard to total volume), multiple layers of 1/2″ panels are easiest to install since they don’t need to be scored.  And in the grand scheme of things, the extra $8 per 1 inch thickness in a 4’x8′ panel is probably well-worth the extra cost in saved time and the fact that there are no voids from scoring and bending like the ones that will be created in the 1″ panels.

An added advantage of both rigid panels and foil faced flexible foam is you can run wires in the voids.

Other

FWIW, I’ve not heard of anyone using “blown-in” cellulose or recycled denim, but I would think potential moisture penetration would make that a bad choice, as well as major settling of the material from the motion and vibration of the trailer.

Thermal Bridge

Finally, something to consider is the thermal bridge… anywhere things “touch” from outside to inside will conduct heat/cold.  Insulation can help mitigate this effect between exterior skin and interior skin, but the major problem area is the ribs, which touch both the exterior skin and interior skin, and are made from highly conductive aluminum!

I tried looking in to Aerogel/Thermagel for the Thermal Bridge.  Specifically I e-mailed, called, and even snail-mailed Aspen Aerogels in Massachusetts, but I never received a response.  I assume this is because I’m “small beans,” and they deal with only multi-million dollar outfits.  Considering they seem to be marketing mostly to the oil industry, I am almost certain that Aerogel is cost prohibitive.  I have a cousin in green tech and solar who let me know that Aerogel in it’s original form is pretty hard to work with.  It was described to me as tapioca-like goo inside a thin wrapper.  I would think punching a bunch of rivets through a bag full of pudding wouldn’t work so well.

I have wondered about using neoprene, some left over EPDM rubber I have from the roof on my studio, or even just the blue role of closed-cell poly material that you use between a house’s framing sill plate and the concrete foundation when building a house (i.e. something like Dow Weathermate Polystyrene which is readily available at Lowe’s/Home Depot).  I’m not sure if such a thin layer of material would really help prevent heat transfer at the ribs.  And even though it’s thin, I’m wondering if it would be a problem (an extra layer of material) between the ribs and skin.

On to part 2: practical application (what I actually did)…

Airstream Interior Idea Pin Board

Interior Skins – Inventory and Cleaning

The nastiest thing I have to deal with regarding our already gutted Zeppelin is the interior skins.  I’m sure they were pretty nasty to begin with (nicotine build up since 1972 and the adhesive on the back side), but they’ve also been stored on the floor of a barn for quite a while, so they’re covered in goat and chicken sh*t, and the resultant mold and other weird goos, fuzz, and oozy things that have grown on top of that.

Still, I will consider myself lucky to have the panels, as these metal skins are part of the the monocoque design and strengthen the trailer by riveting to the interior of the ribs.

I still haven’t decided if I’ll end up painting the interior side or trying to remove the vinyl covering to reveal the bare aluminum, but first things first, I need to see what’s there and get them cleaned off for the drive home.


Airstream Dishwasher

At first thought a dishwasher might seem like an “extreme luxury” for an Airstream, but it’s actually a smart move when considering  water conservation.  Study after study has shown that a dishwasher (especially high efficiency ones like the Bosch in our home kitchen) use far less water than hand washing in the sink.  The models I have listed below uses around 3 1/4 gallons for a full load (6 place settings plus whatever else you can Tetris in there).

Not to mention, it stores your dirty dishes (until you’re ready to run the cycle), so you aren’t stacking dirty dishes in the sink (cluttering up your surroundings, preventing you from using the sink, attracting flies, etc.).

I first had the idea of putting a dishwasher in an Airstream when I saw a custom-ordered Fischer and Paykel unit on clearance at Lowe’s.  I now really wish I had bought it; I think it was marked down from $1,000 to $200.  Since it was designed for home use, it was probably too heavy and power hungry for an Airstream though (I will let these sour grapes console me).

After searching “Airstream Dishwasher” I first learned about the Koldfront PDW60EB via this post:

http://www.airforums.com/forums/f432/rv-dishwasher-104296.html

It’s around $211 in white, another ten bucks in black, and $240-$260 depending on which “brand” in silver (I wonder how close to “stainless” it really looks).

Koldfront, EdgeStar, Midea, SPT (the actual manufacturer?), Sunpentown (old name for SPT, I assume), Danby: judging by the item descriptions on Rakuten (they are pretty much word-for-word), I am assuming these are all “rebranded” versions of the same unit.  There are some slight variations in the controls (knobs vs. buttons,  number of buttons, digital readout, etc.), but the functionality/specs seem to be the same.  The models are things like PDW60W, PDW61W (newer), DDW611WLED, SD-2201W, SD-2202W (newer); the W stands for white in these models; other models use B for black and S for silver.  It looks to me like the PDWW61 and SD-2202 are second generation models and they added the ability to delay the start time for up to 8 hours.

The descriptions state that an internal water heater gets the water temperature to 149 degrees Fahrenheit (not very high compared to the Bosch in my house, but still much hotter than hand washing).  I am a big fan of the stainless interior (and not just because it matches the Airstream!). The unit also has an automatic rinse agent dispenser, which is nice for keeping your glassware spotless (I plan on serving quite a few cocktails!).  These units also have an internal pump for waste water, so you don’t have to rely on gravity.

They are made to simply attach to your kitchen sink faucet and can be removed when not in use, but I plan on “hard wiring” mine to a water and drain line.

Water consumption (normal wash): 3.5 gallons • Input voltage: 120 V/60 Hz • Power: 1160 W/10.7 A • Weight: 48.5 lbs • Dimensions: 17-3/16″ H x 21-11/16″ W x 19-11/16″ D” • Noise level: 55±3dB • Six (6) standard place setting capacity • Includes dish rack, cup shelf, and cutlery basket • Holds plates up to 10.5″ in diameter • Six (6) wash cycles: heavy, normal, light, glass, speed and soak (I’m assuming I would only ever use the “heavy” cycle, but still…)

User reviews state that the heaviest wash takes around an hour and forty five minutes and the “soak” setting is around 10 minutes (the other settings are just variations on time).  It’s best to make sure the water is running hot from the tap before starting the unit (so you get the hottest water possible and put less stress on the unit’s internal heater).  The biggest complaint seems to be the unit does not dry your dishes, but that seems to be expecting a bit much (the unit won’t do your laundry either).  Some people have mentioned just opening the unit’s door slightly right when the cycle is finished and the retained heat of the things being washed will allow everything to dry (though you’ll be venting steam into your living space).

SPT-SD-2202S EdgeStarDWP61ES

Koldfront-PDW60EBMideaADC3203DWW


Finally, a little humor from the Airstream forums.  This is what GeocamperAS posted regarding Airstream dishwashers:

I have been searching high and low for a RV dishwasher.
Not just any RV dishwasher, but one that meets my criteria.

I finally found one.

It is small so it doesn’t take up much space.
It also uses very little water.
It can be used on electric mode when you have hook-ups.
I can be used on non-electric mode when boondocking.
And even though it is small it can clean the largest pot you have.

electric-dishwasher-2

Using a Kitchen Sink for a Shower Pan

Kitchen Sink as Airstream Shower PanI’ve been thinking about using a utility sink (often referred to as a “slop sink” or “mop sink”) for our Airstream’s shower pan.  I was at an architectural salvage place last week, and they had a high-end, black kitchen sink.  PERFECT.  It looks cool.  It’s very sturdy.  And it’s a single basin with a kind of “step” for dishes that will now be an actual step!

There are two holes (faucet and soap dispenser) that will either get plugged, or maybe I’ll actually run copper pipe through the holes as part of the shower design.

This “designer” sink obviously looks waaaay better than a plastic slop sink, even though it weighs a bit more (though, that comes with being much more durable than thin plastic).  I think having a shallower sink (vs. a utility sink) will be better too.  It’s still deep enough for a kid to take a bath, but it won’t be such a pain to climb in.